


Help
Click above to download or print
instructions for installing your Wren unit.
DASHBOARD SET-UP
See below for step-by-step instructions
for setting up your dashboard.
HOW TO SET-UP YOUR DASHBOARD

Step 1
Welcome to your dashboard
You have all of your Wren units, now it is time to get them all up and running. From here you will set up the ZONES (or general areas in your facility), ROOMS, and the DEVICES themselves as well as adding additional users to the system and running reports. Let's get started!
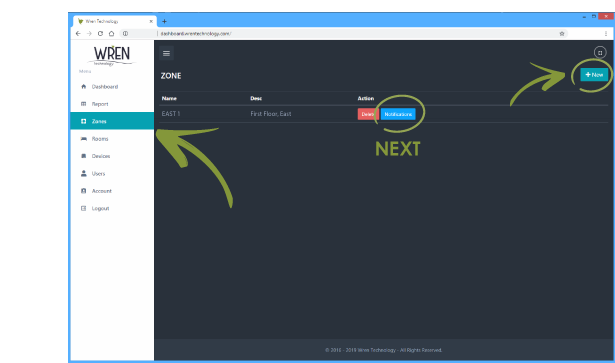
Step 2
Zone set-up
Click on ``Zones`` in the left-hand menu then ``New`` in the upper right corner. Here you will create a ZONE for each area, or block of rooms, in your facility to be monitored together. Give it a name that makes sense to you. For example: location in the building, patient type, or current wing/area name would all work. Once you have given it a name and a helpful description, click ``Submit.`` Then click on ``Notifications`` next to the ZONE you just named.
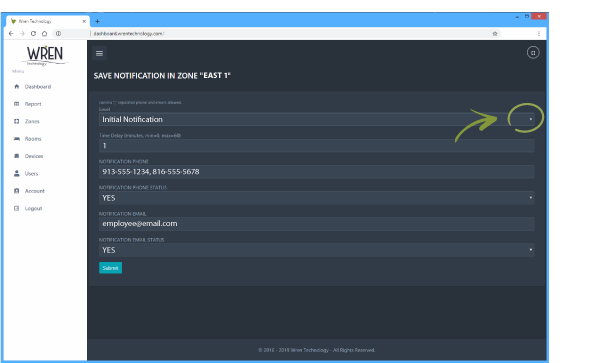
Step 3
Zone notifications and escalation
Here you will set notifications for when an event takes place in the given ZONE. Start by clicking ``New`` in the upper right corner, then begin with the ``Initial Notification.`` The ``Time Delay`` is the amount of time after the event has taken place that you would like to be notified (a value of ``0`` will be the instant the event happens). The ``Notification Phone`` is the number(s) to receive a text message. If you use a paging system, this is where you would enter the number to the system. ``Notification Email`` is for any email address(es) you would like to send a notification. Once complete, click ``Submit.`` For escalation notifications, click ``New`` again, then select ``Escalation 1`` from the first drop-down. The ``Time Delay`` here is the minutes after the prior notification has occurred if the event has still not been cleared. Simply add ``New`` for each level of escalation you would like. Notifications will continue through all escalations until the event has been cleared.
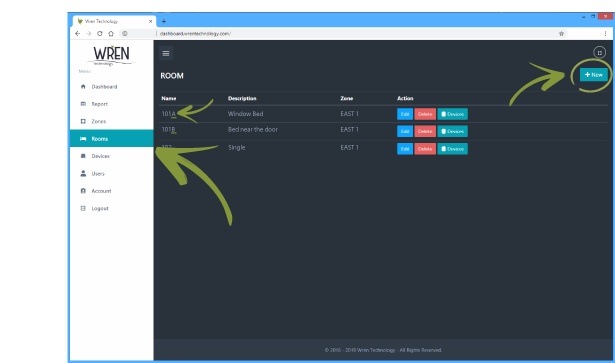
Step 4
Room set-up
Click on ``Rooms`` in the left-hand menu then ``New`` in the upper right corner. From here you will give each ROOM a name and a description. Here you will also choose which ZONE the room is located. If there will be more than one Wren unit in the ROOM, give them each their own ``Room`` name (ex: 101A and 101B). You can use the description field to designate the difference (ex: ``Window Bed`` or ``Bed nearest the door``). Once you set up the DEVICES in the next step, you will be able to click ``Devices`` next to each room and view the individual details.
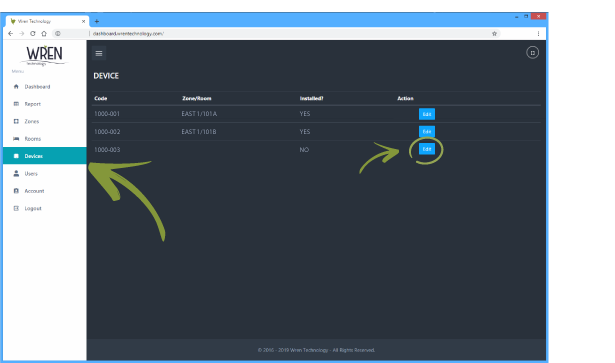
Step 5
Device installation
After clicking ``Devices`` from the left-hand menu you will see a list of all of your available DEVICES. For each DEVICE, click ``Edit`` and choose the ZONE first, then ROOM where this DEVICE will be located. By clicking ``Submit`` your DEVICE will be successfully installed. All you have left now is to physically install the unit in the designated ROOM. Download the installation guide above if you need a little help.
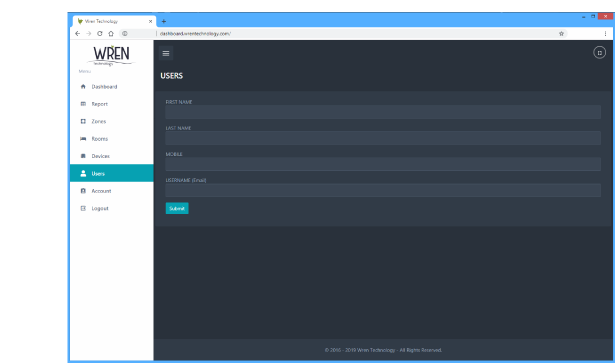
Step 6
Add additional users
If there is anyone else you would like to have access to the dashboard, you can add them here. After clicking ``Users`` in the left-hand menu and ``New`` in the upper right corner, you can fill in their name, phone, and email. Once submitted, they will be added to the list of users and will get an email with a password. They will then be able to login and access the dashboard. The difference being they will not have access to the ``Users`` tab.
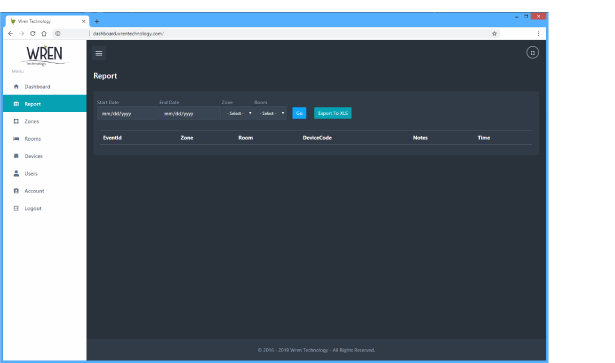
Step 7
Run reports
After clicking ``Report`` you have the ability to choose the date range, ZONE, and ROOM to get a report of all events with time stamps and notes during the chosen date range from that particular DEVICE. There is also a button that allows you to export that data to XLS.